SAP DI ML Scenario pipeline to predict the Car Price
This blog demonstrates how to build a very simple ML project in SAP Data Intelligence to predict a price of a Car, We will train a multiple predictor column linear regression model in Python.
You will become familiar with the core components of an ML scenario in SAP Data Intelligence after this introductory tutorial, and the deployment of more advanced requirements will likely take a similar pattern.
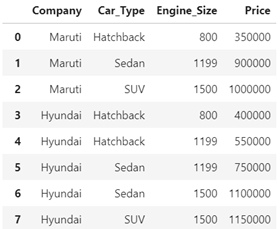
Training data
Our dataset is a small CSV file, which contains Company,Cartype,EngineSize and Price.
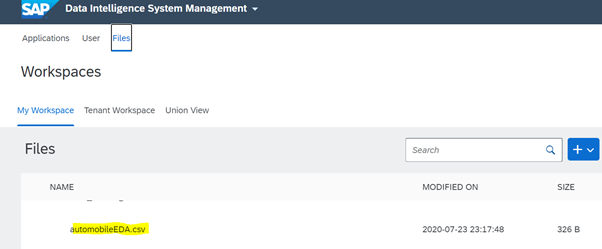
Source
SAP Data Intelligence can connect to many sources but for this tutorial we will place the file in DI workspace.
ML Scenario manager and machine learning
Go back to SAP Data Intelligence’s home page and press the “ML
Scenario Manager,” where you can conduct all the tasks related to Machine Learning.
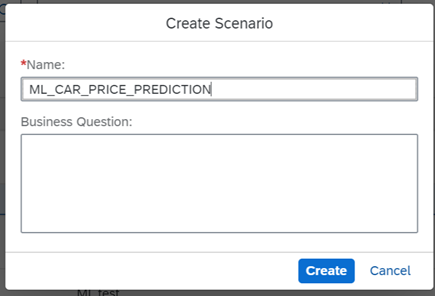
Give name to your task in ML scenario.
Open Jupyter notebook from the scenario manager that you have create “ML_CAR_PRICE_PREDICTION”.
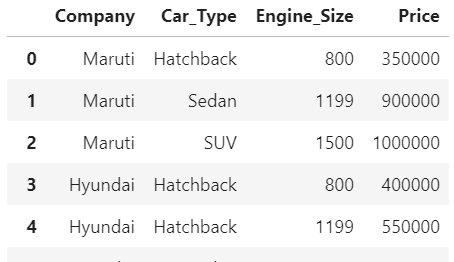
Go to your notebook and type below code in Python to import your file .
import json
import pandas as pd
import numpy as np
with open('/vrep/vflow/automobileEDA.csv','rt')as f:
    df = pd.read_csv(f)
df
Once you execute the code you will get the results as below:
Training Model
First you have to install sklearn module in notebook if its not there.Use below command to install the package:
pip install sklearnNow we have to convert our datasets into Binary values because Column Company,Car_type are in string format and Column price which we are going to predict is in Number format, so our Linear Regression algorithm want work if the data type of columns are different.
Execute below code to convert the data :
import json
import pandas as pd
import numpy as np
from sklearn.linear_model import LinearRegression
from sklearn.metrics import mean_squared_error
with open('/vrep/vflow/automobileEDA.csv','rt')as f:
df = pd.read_csv(f)
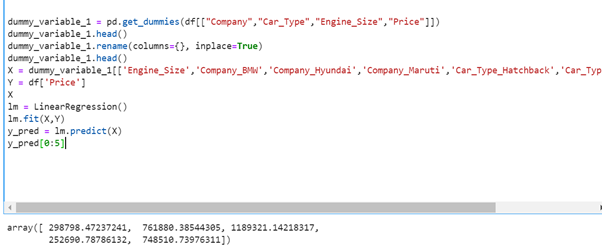
dummy_variable_1 = pd.get_dummies(df[["Company","Car_Type","Engine_Size","Price"]])
dummy_variable_1.head()
dummy_variable_1.rename(columns={}, inplace=True)
dummy_variable_1.head()
X = dummy_variable_1[['Engine_Size','Company_BMW','Company_Hyundai','Company_Maruti','Car_Type_Hatchback','Car_Type_SUV','Car_Type_Sedan']]
Y = df['Price']
X
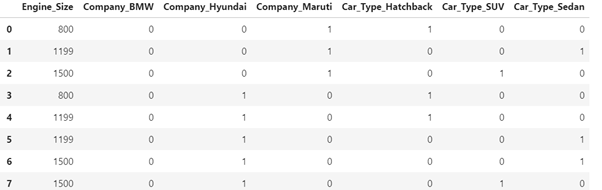
After executing the above code, dataset will look like in below format:
Now execute the remaining part of code to get the predictions .
lm = LinearRegression()
lm.fit(X,Y)
y_pred = lm.predict(X)
y_pred[0:5]
If you are able to see the results then code is working fine till now:
Save regression model
You may apply the model on a new observation immediately. Here, we will use one graphical pipeline to train and save the model and a second pipeline to predict.
Execute below code to save the model.
import pickle
pickle.dump(lm, open("lm.pickle.dat", "wb"))
Load and apply Regression Model
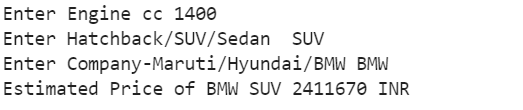
Use the following code to load the model that has just been saved.Once you execute the below code it will ask to enter an input like company ,engine size and segment type and after that it will return the predicted price of car.
import pickle
lm_loaded = pickle.load(open("lm.pickle.dat", "rb"))
#x_new = dummy_variable_1[[1200,1,0,0,0,1,0]]
#x_new = [1200,1,0,0,0,1,0]
#x_new
a=0
b=0 #hatchback
c=0  #SUV
d=0  #Sedan
e=0  #BMW
f=0  #Hyundai
g=0  #Maruti
h=0  #Base
i=0  #Second
j=0  #First
d1=''
a=input('Enter Engine cc')
k=int(a)
b1=input('Enter Hatchback/SUV/Sedan ')
c1=input('Enter Company-Maruti/Hyundai/BMW')
#d1=input('Enter Model- Base/Second Top/Top')
if b1=='Hatchback':
    e=1
else:
    e=0
if b1=='SUV':
    f=1
else:
    f=0
if b1=='Sedan':
    g=1
else:
    g=0
if c1=='Maruti':
    d=1
else:
    d=0
if c1=='Hyundai':
    c=1
else:
    c=0
if c1=='BMW':
    b=1
else:
    b=0
if d1=='Base':
    h=1
else:
    h=0
if d1=='Second Top':
    i=1
else:
    i=0
if d1=='Top':
    j=1
else:
    j=0
Predictions=lm_loaded.predict([[k,b,c,d,e,f,g]])
print('Estimated Price of',c1,b1, int(Predictions),'INR')
Below will be the output after execution:
Deployment of Model
All is in place now to start deploying the model in two graphical pipelines.
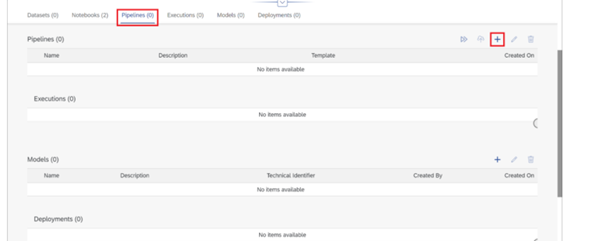
To create the graphical pipeline to retrain the model, go to the main page of your ML Scenario, select the “Pipelines” tab, then click on the “+” sign.
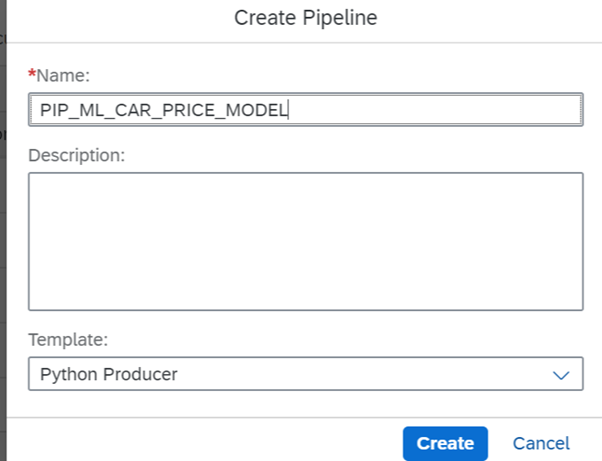
Name Pipeline and select Python Producer in template.
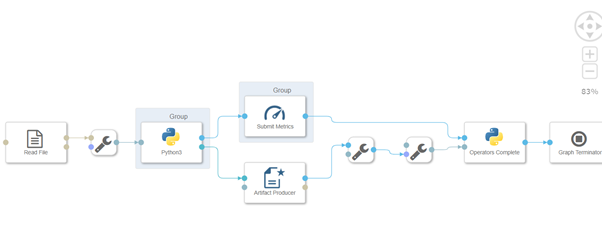
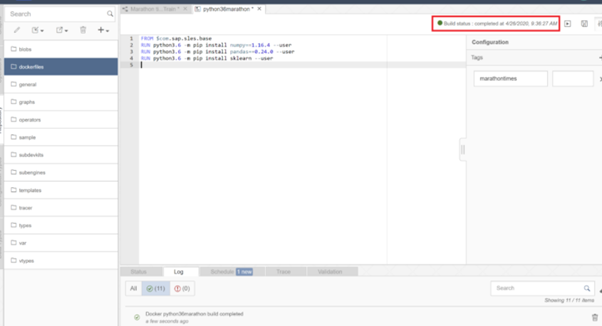
You should see the following pipeline generate with all components connected with each other.
The pipeline loads data mainly with the “Read File”-operator. The data is passed to a Python-operator, where the ML model is equipped. The same Python-operator stores the model as “Artifact Processor” in the ML Scenario. The second output of the Python-operator may pass a model’s quality metric to the same ML Scenario. When both the model and the metric are saved, the “Graph Terminator” terminates the execution of the pipeline
Now either you can pass the source file in Read file operator or you can just do in Python operator also.
Now either you can pass the source file in Read file operator or you can just do in Python operator also.
Example Python script to perform training on input data & generate Metrics & Model Blob
import pandas as pd
import numpy as np
from sklearn.linear_model import LinearRegression

# Example Python script to perform training on input data & generate Metrics & Model Blob
#def on_input(data):
with open('/vrep/vflow/automobileEDA.csv','rt')as f:
    df = pd.read_csv(f)

dummy_variable_1 = pd.get_dummies(df[["Company","Car_Type","Engine_Size","Price"]])
#dummy_variable_1.head()
dummy_variable_1.rename(columns={}, inplace=True)
dummy_variable_1.head()


X = dummy_variable_1[['Engine_Size','Company_BMW','Company_Hyundai','Company_Maruti','Car_Type_Hatchback','Car_Type_SUV','Car_Type_Sedan']]
Y = df['Price']
lm = LinearRegression()
lm.fit(X,Y)
y_pred = lm.predict(X)
mse = np.mean((y_pred - Y)**2)
rmse = np.sqrt(mse)
rmse = round(rmse, 2)

    # to send metrics to the Submit Metrics operator, create a Python dictionary of key-value pairs
metrics_dict = {"R-square": str(rmse), "n": str(len(df))}
    #metrics_dict = {"kpi1": "1"}

    # send the metrics to the output port - Submit Metrics operator will use this to persist the metrics
api.send("metrics", api.Message(metrics_dict))

    # create & send the model blob to the output port - Artifact Producer operator will use this to persist the model and create an artifact ID
import pickle
model_blob = pickle.dumps(lm)
api.send("modelBlob", model_blob)
    #model_blob = bytes("example", 'utf-8')
    #api.send("modelBlob", model_blob)


#api.set_port_callback("input", on_input)
Copy and paste the above script in Python operator and click on save graph button.
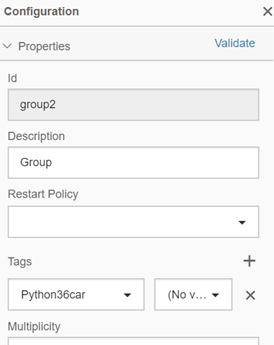
Assign tags to python operator
We have to assign a tags like ,Numpy,pandas,sklearn to python operator otherwise it will through an error “Module not found’ when we will execute the pipeline.
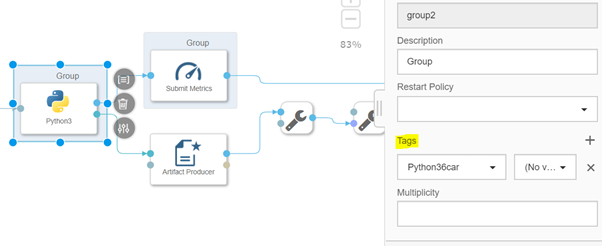
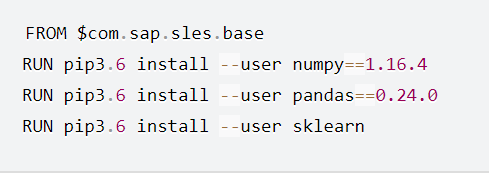
Note : If in tags you don’t find list of module you are using then need to create a docker file.
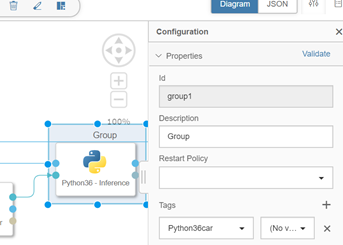
Here I have created a docker file with name “Python36car” which will install the module -numpy,pandas and sklearn
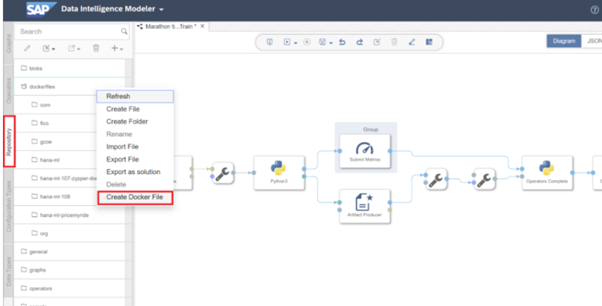
Enter the below code in docker file.
Now save the Docker file and click the “Build”-icon to start building the Docker image.
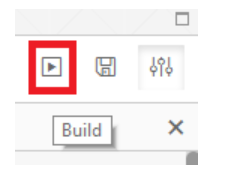
After few minutes you should receive a confirmation that the build completed successfully.
Then you can view tag in the configuration panel.
Now save the pipeline again.
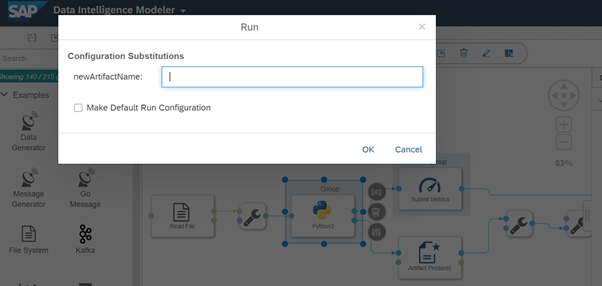
Pipeline execution
Click on execution button to start the execution of pipeline. Window will be pop up to give the name to artifact which get generated after the execution. Give appropriate name to Artifact.
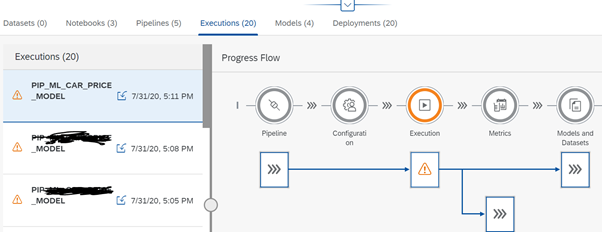
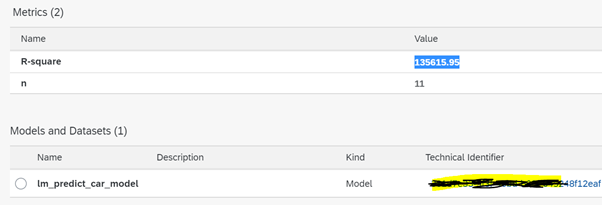
Click “Save” button. Wait a few seconds for the pipeline to complete and. The metrics section displays the consistency measure of the training model (RMSE = 135615.95), and the number of records used to train the model (n = 11). The code itself was effectively saved under the tag lm model. You can view these details under ML scenario manager .
Prediction / Inference using REST-API
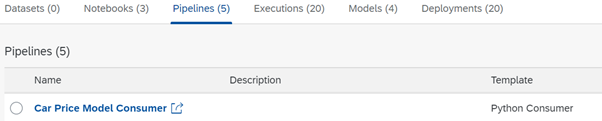
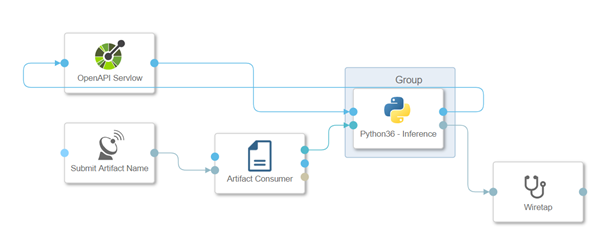
Go back to your ML Scenario ‘s main tab, and build a second pipeline. This pipeline will provide the REST-API to get real-time predictions. Now pick ‘Python Consumer’ template. This framework includes a pipeline which provides a REST-API.
The REST-API is provided by the Operator “OpenAPI Servlow.” The “Artifact Consumer” loads from our ML scenario the trained model and the operator “Python36-Inference” connects the two operators together. It accepts the feedback from the REST-API call (here the Car Inputs) and uses the loaded model to create the estimate, which is then returned to the client by the “OpenAPI Servlow,” the REST-API request.
Here also you have to assign tag to the Pytho36 Interface
We need to modify the Python code to accept the car inputs and call the model to predict the price. Copy and paste the below code after modifying in Python36 operator.
import json

# Global vars to keep track of model status
model = None
model_ready = False

# Validate input data is JSON
def is_json(data):
  try:
    json_object = json.loads(data)
  except ValueError as e:
    return False
  return True

# When Model Blob reaches the input port
def on_model(model_blob):
    global model
    global model_ready

    import pickle
    model = pickle.loads(model_blob)
    model_ready = True
    api.logger.info("Model Received & Ready")
    api.send("logging", "Model Ready!")

# Client POST request received
def on_input(msg):
    error_message = ""
    success = False
    prediction = None # This line needs to be added
    api.send("logging", "Model Ready!")
    try:
        api.logger.info("POST request received from Client - checking if model is ready")
        if model_ready:
            api.logger.info("Model Ready")
            api.logger.info("Received data from client - validating json input")

            user_data = msg.body.decode('utf-8')
            # Received message from client, verify json data is valid
            if is_json(user_data):
                api.logger.info("Received valid json data from client - ready to use")

                # apply your model
                # obtain your results
                b=0 #hatchback
                c=0  #SUV
                d=0  #Sedan
                e=0  #BMW
                f=0  #Hyundai
                g=0  #Maruti
                Engine_Size = json.loads(user_data)['Engine_Size(Enter in cc)']
                k =int(Engine_Size)
                b1 = json.loads(user_data)['Car_Segment(Enter Hatchback/SUV/Sedan)']
                c1 = json.loads(user_data)['Car_Company(Enter Maruti/Hyundai/BMW)']
                if b1=='Hatchback':
                    e=1
                else:
                    e=0
                if b1=='SUV':
                    f=1
                else:
                    f=0
                if b1=='Sedan':
                    g=1
                else:
                    g=0
                if c1=='Maruti':
                    d=1
                else:
                    d=0
                if c1=='Hyundai':
                    c=1
                else:
                    c=0
                if c1=='BMW':
                    b=1
                else:
                    b=0

                prediction = model.predict([[k,b,c,d,e,f,g]])
                success = True
            else:
                api.logger.info("Invalid JSON received from client - cannot apply model.")
                error_message = "Invalid JSON provided in request: " + user_data
                success = False
        else:
            api.logger.info("Model has not yet reached the input port - try again.")
            error_message = "Model has not yet reached the input port - try again."
            success = False
    except Exception as e:
        api.logger.error(e)
        error_message = "An error occurred: " + str(e)

    if success:
        # apply carried out successfully, send a response to the user
        msg.body = json.dumps({'Car price prediction of '+ b1 +' '+ c1 +' is INR': round(prediction[0], 0)})
        request_id = msg.attributes['message.request.id']
        response = api.Message(attributes={'message.request.id': request_id}, body=msg.body)
        api.send('output', response)
        msg.body = json.dumps({'Results': 'Model applied to input data successfully.'})
        request_id = msg.attributes['message.request.id']
        response = api.Message(attributes={'message.request.id': request_id}, body=msg.body)
        api.send('output', response)

    else:
        msg.body = json.dumps({'Error': error_message})

    # extended as discussed


api.set_port_callback("model", on_model)
api.set_port_callback("input", on_input)
Save the graph . Go back to ML Scenario manager under your Folder ,select pipeline and click on deploy icon .
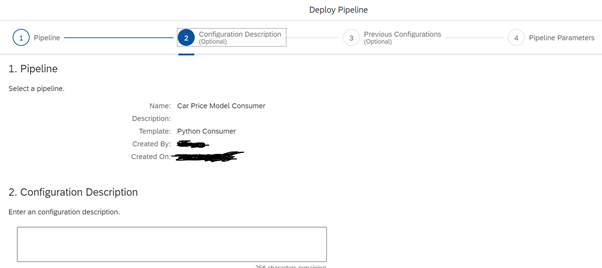
Click through the screens until you have a drop-down to select the trained model. Click “Save” button.
Wait for sometime and pipeline will show in the running mode. Copy the Pipeline url .
Open the Postman rest api to test the output. open Postman and enter the Deployment URL as request URL. Extend the URL with v1/uploadjson/. Change the request type from “GET” to “POST”.
Input format
{
    "Engine_Size(Enter in cc)":	1300,
    "Car_Segment(Enter Hatchback/SUV/Sedan)":	"Hatchback",
    "Car_Company(Enter Maruti/Hyundai/BMW)":	"Maruti"

}
Click on Send button.
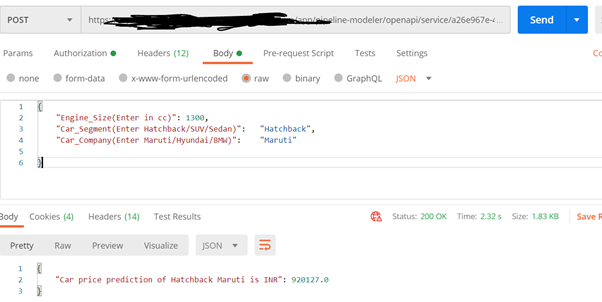
Finally you will get the output with the prediction of Car Price Maruti Hatchback Segment.
Note: Model used to predict the car price is very basic model and it not should be used to do the prediction in Real time scenarios.Purpose of this blog was to understand the end to end connectivity.